In this post, we will see how to use Core Data in an iOS project.
But first if all, what is Core Data?
From Apple web site:
“Core Data is a framework that you use to manage the model layer objects in your application. It provides generalized and automated solutions to common tasks associated with object life cycle and object graph management, including persistence.
Core Data typically decreases by 50 to 70 percent the amount of code you write to support the model layer. This is primarily due to the following built-in features that you do not have to implement, test, or optimize”
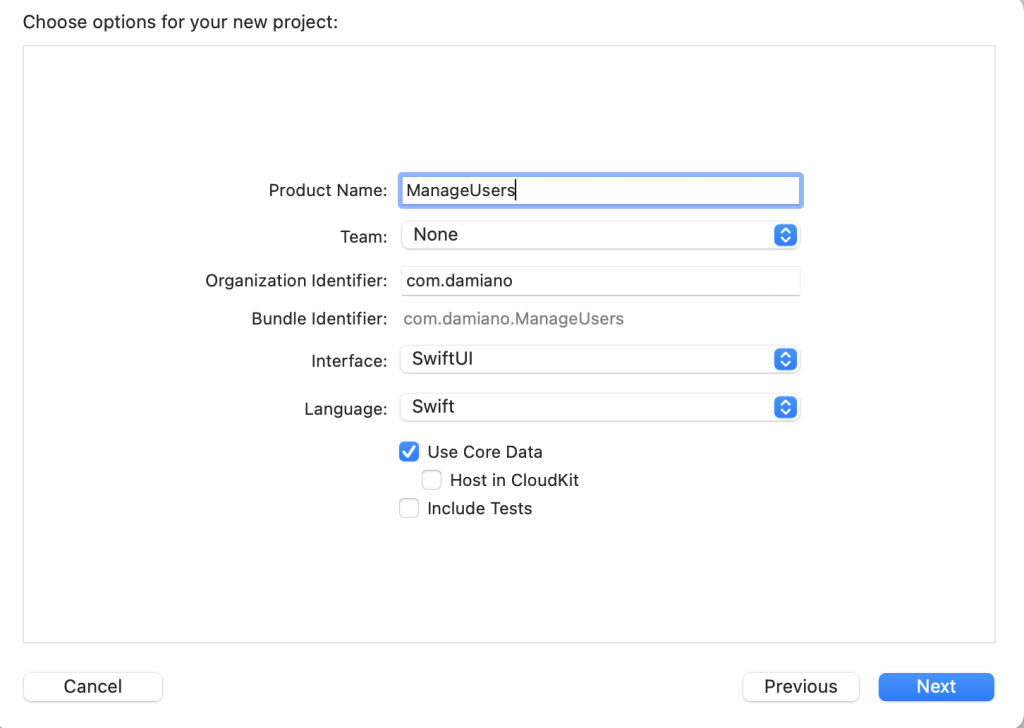
For understanding better Core Data, we will create an iOS application called ManageUsers where we will run all CRUD operations for the entity User, using Core Data.
We start creating a project, checking the option “Use Core Data”:
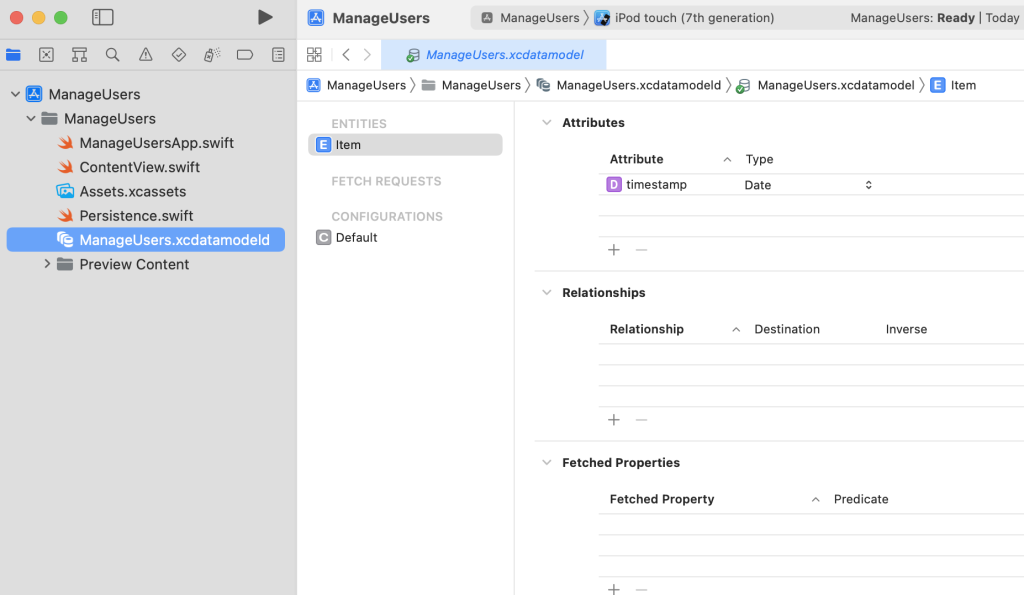
In the project, we can see a .xcdatamodeld file that is the file where we will manage the entities:
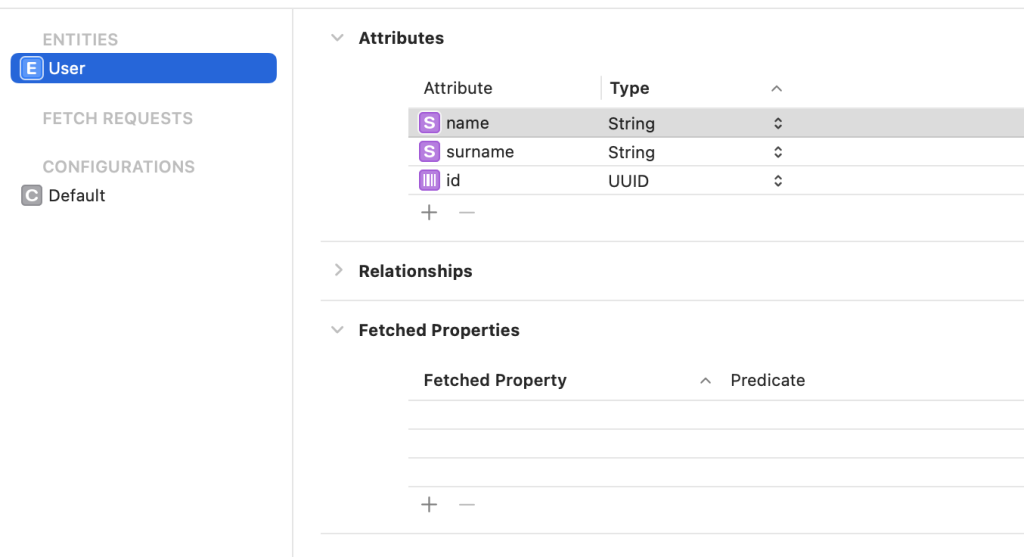
We can delete the default Item entity and we create a new one called User, so defined:
Then, we have to modify in the file Persistence.swift the property “preview” (it allows us to use the CoreData functionality inside preview simulators):
static var preview: PersistenceController = {
        let result = PersistenceController(inMemory: true)
        let viewContext = result.container.viewContext
        for _ in 0..<10 {
            // code created by Xcode ->  newItem = Item(context: viewContext)
            // code created by Xcode ->  newItem.timestamp = Date()
            let newItem = User(context: viewContext)
            newItem.id = UUID()
            newItem.surname = "Surname"
            newItem.name = "Name"
        }
        do {
            try viewContext.save()
        } catch {
            // Replace this implementation with code to handle the error appropriately.
            // fatalError() causes the application to generate a crash log and terminate. You should not use this function in a shipping application, although it may be useful during development.
            let nsError = error as NSError
            fatalError("Unresolved error \(nsError), \(nsError.userInfo)")
        }
        return result
    }()
Now, we come back in the .xcdatamodeld file in order to generate the code of the User entity, that we will use for managing it.
We open the model file, we open the Editor item and then we select “Create NSManagedObject Subclass..”:
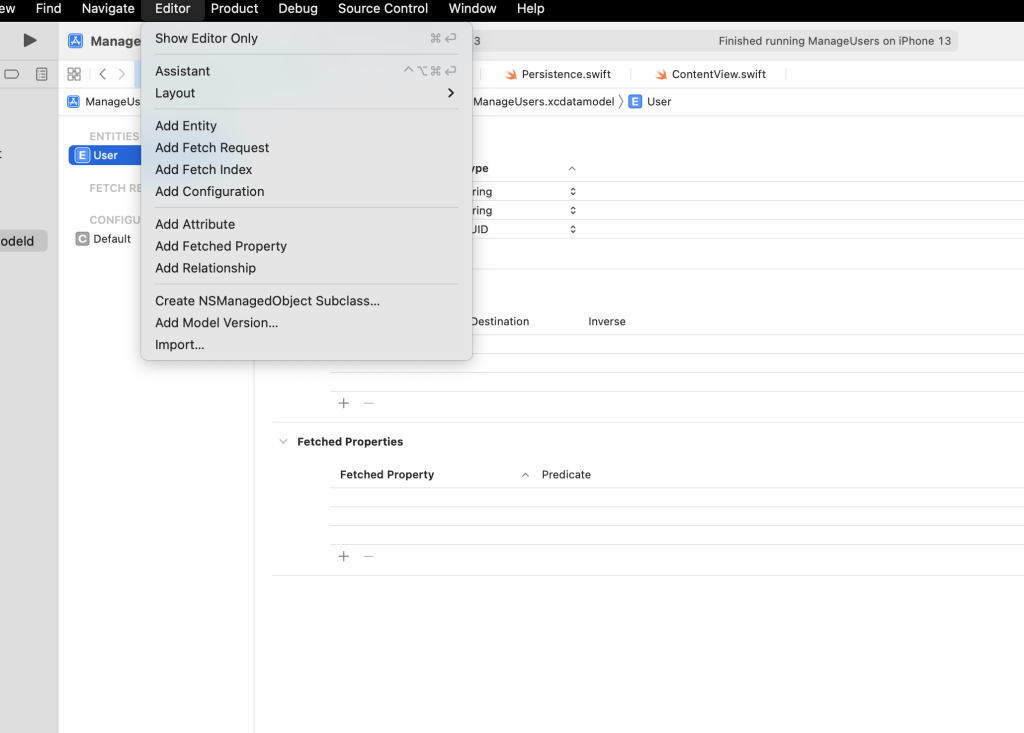
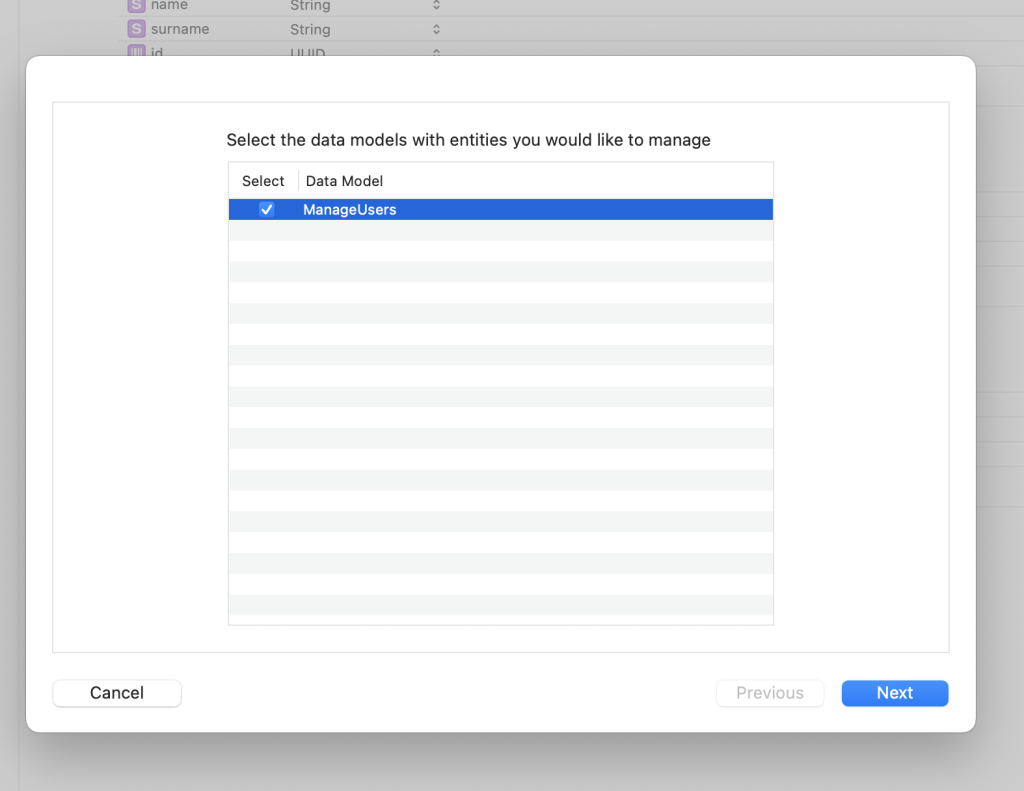
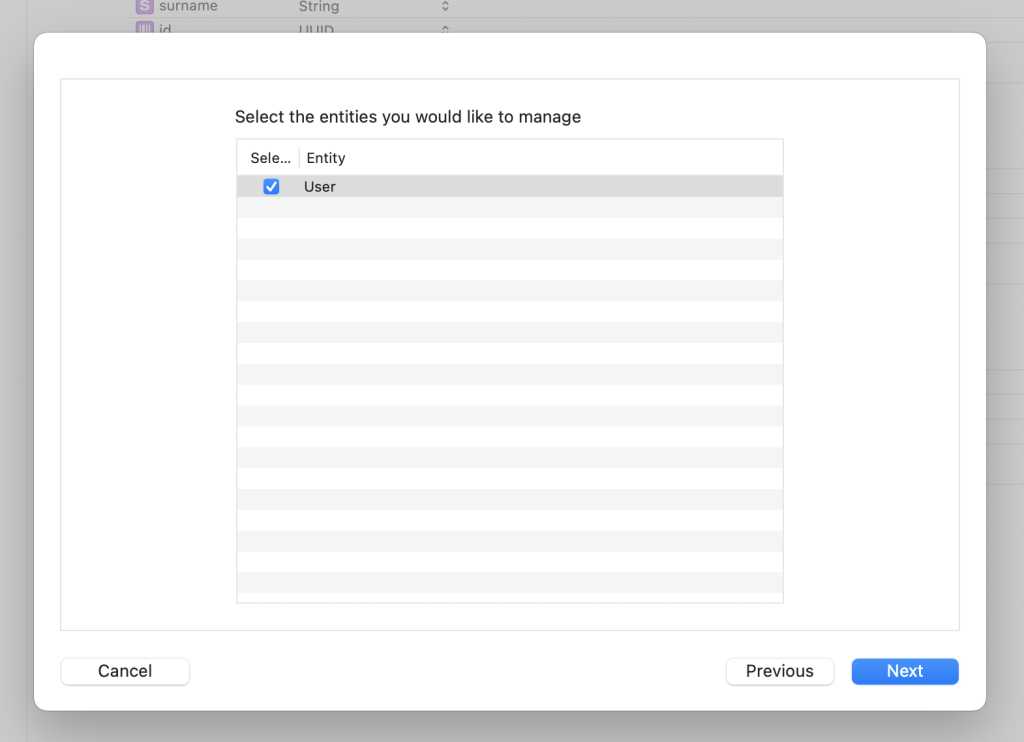
Now, in the project, we have other two new files called User+CoreDataClass.swift and User+CoreDataProperties.swift:
[User+CoreDataClass.swift]
import Foundation
import CoreData

@objc(User)
public class User: NSManagedObject {

}
[User+CoreDataProperties.swif]
import Foundation
import CoreData


extension User {

    @nonobjc public class func fetchRequest() -> NSFetchRequest<User> {
        return NSFetchRequest<User>(entityName: "User")
    }

    @NSManaged public var id: UUID?
    @NSManaged public var name: String?
    @NSManaged public var surname: String?

}

extension User : Identifiable {

}
Finally, we need to tell Xcode that the data model is no longer defined by “.xcdatamodeld” file only
but, manually defined by the corresponding subclass we just created.
We open the model file, we select the entity and then, in the Class properties (on the right), we choose “Manual Definition” in the Codegen property:

We have finished to setup up the Data layer and now, we can prepare the UI for managing data.
INSERT NEW USER
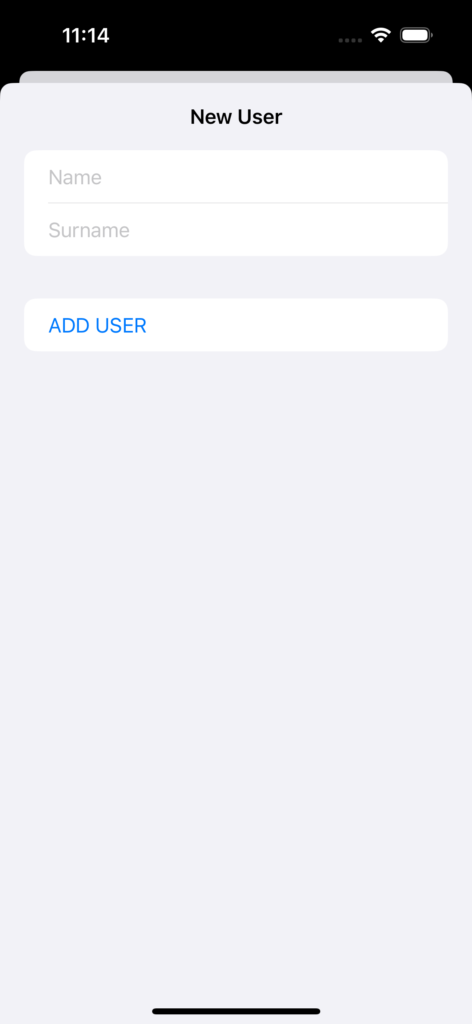
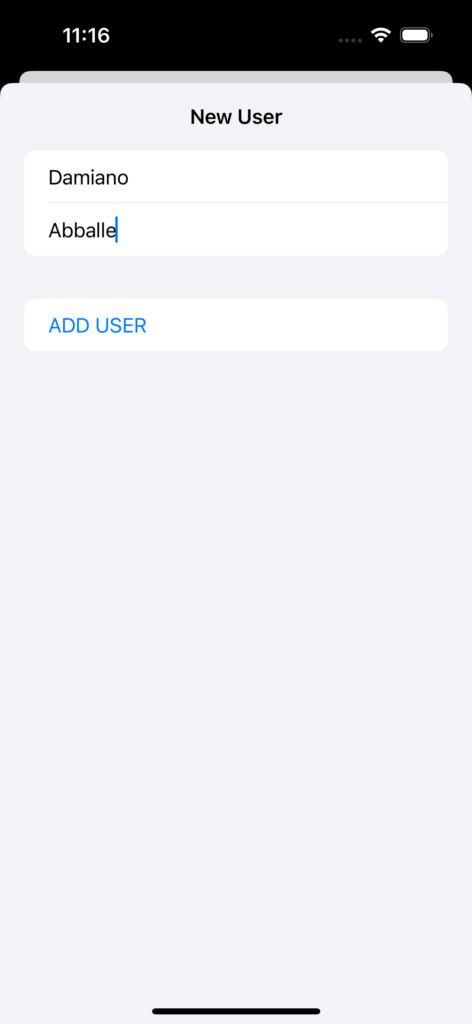
First of all, we add a SwiftUI file called NewUser.swift that it will be the form data for a new User:
[NEWUSER.SWIFT]
import SwiftUI

struct NewUser: View {
    @Environment (\.presentationMode) var presentationMode

    @State var name: String = ""
    @State var surname: String = ""

    func SaveData() {
        presentationMode.wrappedValue.dismiss()
    }

    var body: some View {
        NavigationView {
            Form {
                // Definition of User Info section
                Section{
                    TextField("Name", text: $name)
                    TextField("Surname", text: $surname)
                }
                Button(action: SaveData) {
                    Text("ADD USER")
                }
                .navigationBarTitle(Text("New User"))
            }
        }
    }
}

struct NewUser_Previews: PreviewProvider {
    static var previews: some View {
        NewUser()
    }
}
Then, we modify the file ContentView.swift, in order to use the file above:
[CONTENTVIEW.SWIFT]
import SwiftUI
import CoreData
struct ContentView: View {
// variable used to show the Form for creating a new User
@State var showNewUser = false
var body: some View {
NavigationView{
List{
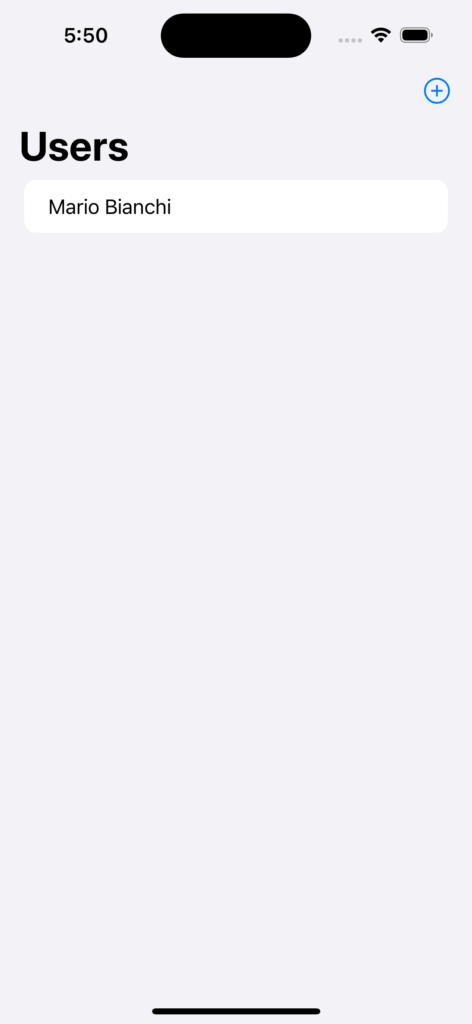
Text("Mario Bianchi")
}
.navigationTitle("Users")
.navigationBarItems(trailing: Button(action: {
showNewUser = true
}, label: {
Image(systemName: "plus.circle")
.imageScale(.large)
}))
.sheet(isPresented: $showNewUser) {
NewUser()
}
}
}
}
If we run the application, this will be the result:
The UI works fine and now, we will add the code in order to save data using Core Data.
First of all, we modify the file NewUser.swift for saving a new User:
[NEWUSER.SWIFT]
import SwiftUI
struct NewUser: View {
@Environment (\.presentationMode) var presentationMode
// with Environment we can access here to the viewContext
@Environment(\.managedObjectContext) private var viewContext
@State var name: String = ""
@State var surname: String = ""
func SaveData() {
// we create a new User and we insert values of Name and Surname
let newUser = User(context: viewContext)
newUser.name = name
newUser.surname = surname
// we create an ID
newUser.id = UUID()
do {
// we try to save the new User
try viewContext.save()
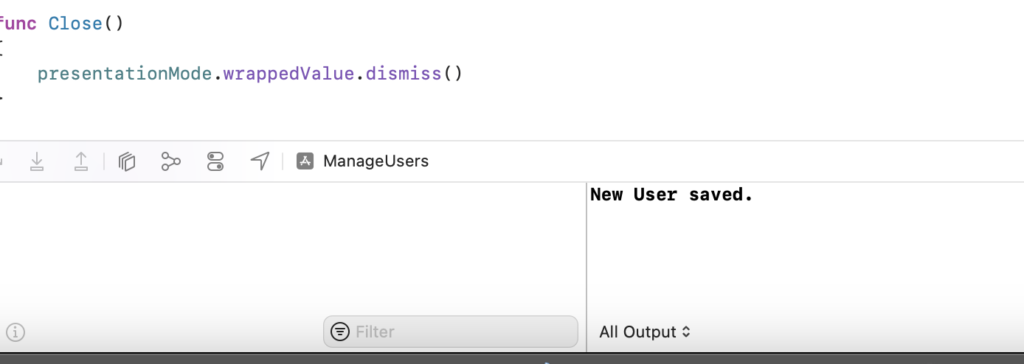
// if it saved, system will print a message in the output view
print("New User saved.")
}
catch {
print(error.localizedDescription)
}
presentationMode.wrappedValue.dismiss()
}
var body: some View {
NavigationView {
Form {
// Definition of User Info section
Section{
TextField("Name", text: $name)
TextField("Surname", text: $surname)
}
Button(action: SaveData) {
Text("ADD USER")
}
.navigationBarTitle(Text("New User"))
}
}
}
}
struct NewUser_Previews: PreviewProvider {
static var previews: some View {
NewUser()
}
}
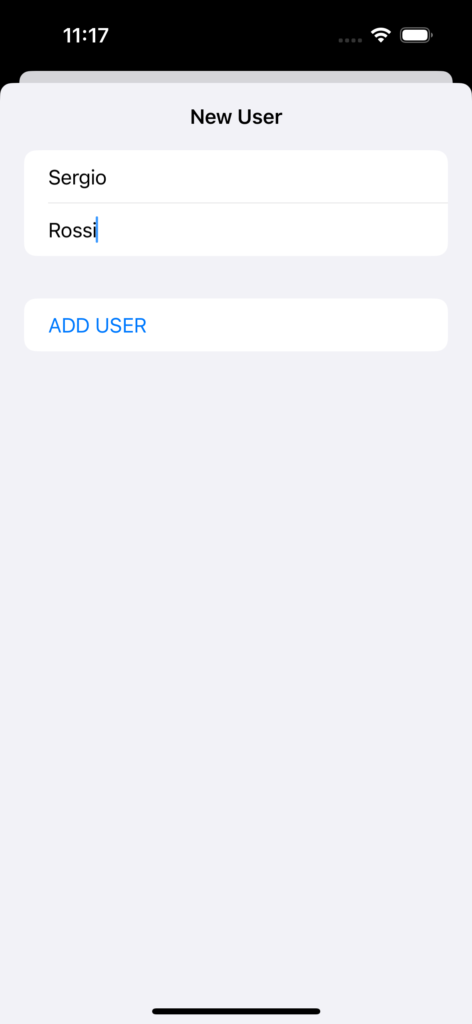
If we run the application, this will be the result:
and in the output view, we will have this message:
LIST OF ALL SAVED USERS
We can see that everything works fine and now, we have to modify the file ContentView.swift for showing the list of saved users:
[CONTENTVIEW.SWIFT]
import SwiftUI
import CoreData

struct ContentView: View {
    // with Environment we can access here to the viewContext
    @Environment(\.managedObjectContext) private var viewContext

    // FetchRequest is used to extract data from the persistent storage
    // In this case the entity User without any sort and any predicate
    // In sql this would be: select * from user
    @FetchRequest(entity: User.entity(), sortDescriptors: [], predicate: nil)
    // We put the result of the query above in a variable called lstUser
    private var lstUser: FetchedResults<User>

    // variable used to show the Form for creating a new User
    @State var showNewUser = false
    var body: some View {
        NavigationView{
            List{
                // we show all users
                ForEach(lstUser) { user in
                    VStack(alignment: .leading){
                        Text("\(user.name!) - \(user.surname!)")
                            .font(.headline)
                    }
                }
            }
            .navigationTitle("Users")
            .navigationBarItems(trailing: Button(action: {
                    showNewUser = true
                }, label: {
                    Image(systemName: "plus.circle")
                        .imageScale(.large)
                }))

            .sheet(isPresented: $showNewUser) {
                    NewUser()
                }
        }
    }
}
If we run the application, this will be the result:
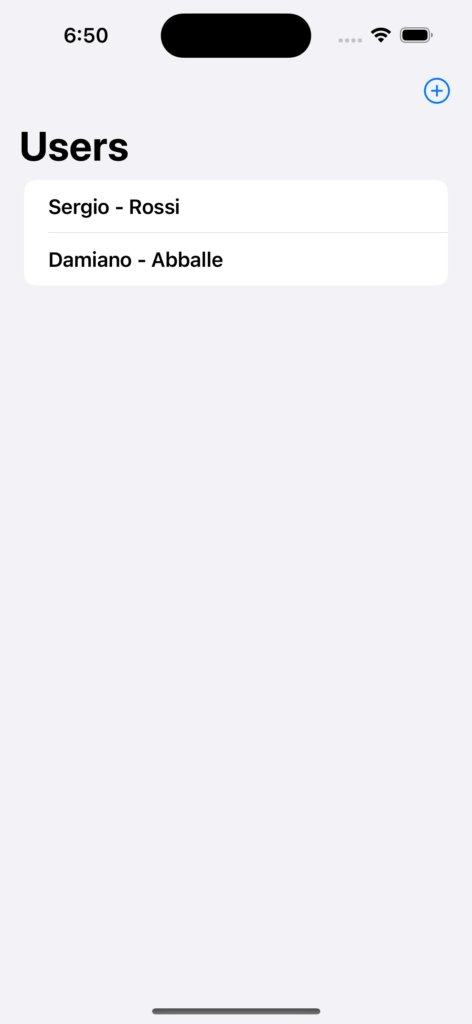
It works fine and now, we will modify the code for adding Delete and Update operations.
DELETE USER
For Delete, we have just to modify the file ContentView.swift in this way:
[CONTENTVIEW.SWIFT]
import SwiftUI
import CoreData

struct ContentView: View {
    // with Environment we can access here to the viewContext
    @Environment(\.managedObjectContext) private var viewContext

    // FetchRequest is used to extract data from the persistent storage
    // In this case the entity User without any sort and any predicate
    // In sql this would be: select * from user
    @FetchRequest(entity: User.entity(), sortDescriptors: [], predicate: nil)
    // We put the result of the query above in a variable called lstUser
    private var lstUser: FetchedResults<User>

    // variable used to show the Form for creating a new User
    @State var showNewUser = false
    var body: some View {
        NavigationView{
            List{
                // we show all users
                ForEach(lstUser) { user in
                    VStack(alignment: .leading){
                        Text("\(user.name!) - \(user.surname!)")
                            .font(.headline)
                    }
                }
                // delete item
                .onDelete {
                    indexSet in
                    for index in indexSet{
                        // we delete the user
                        viewContext.delete(lstUser[index])
                    }
                    do {
                        // save the operation
                        try viewContext.save()
                    } catch {
                        print(error.localizedDescription)
                    }
                }
            }
            .navigationTitle("Users")
            .navigationBarItems(trailing: Button(action: {
                    showNewUser = true
                }, label: {
                    Image(systemName: "plus.circle")
                        .imageScale(.large)
                }))

            .sheet(isPresented: $showNewUser) {
                    NewUser()
                }
        }
    }
}
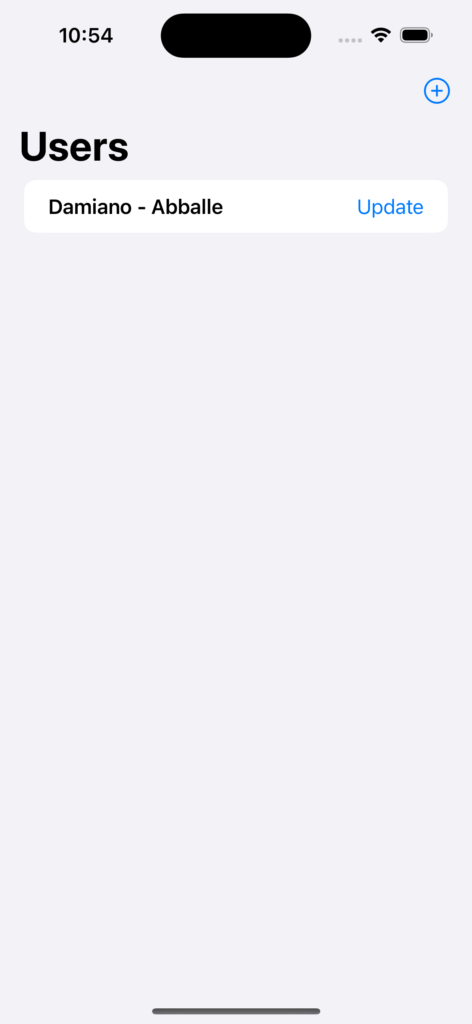
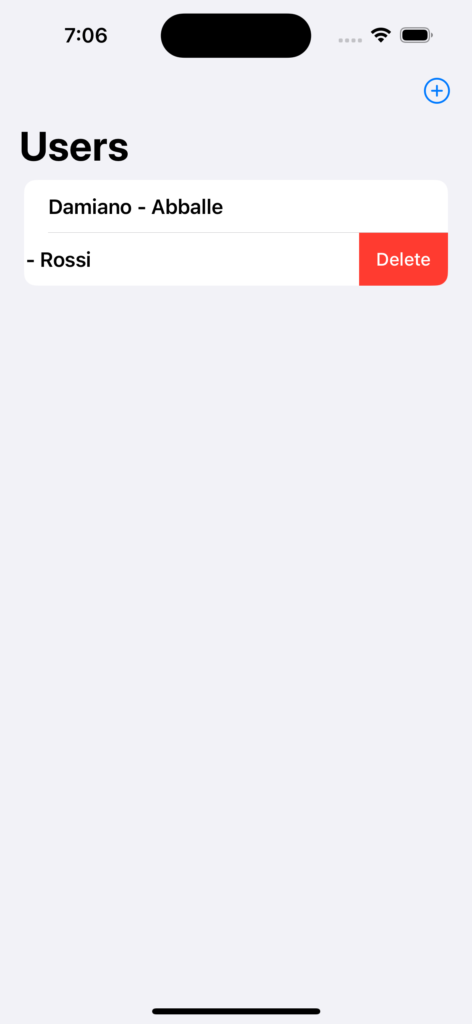
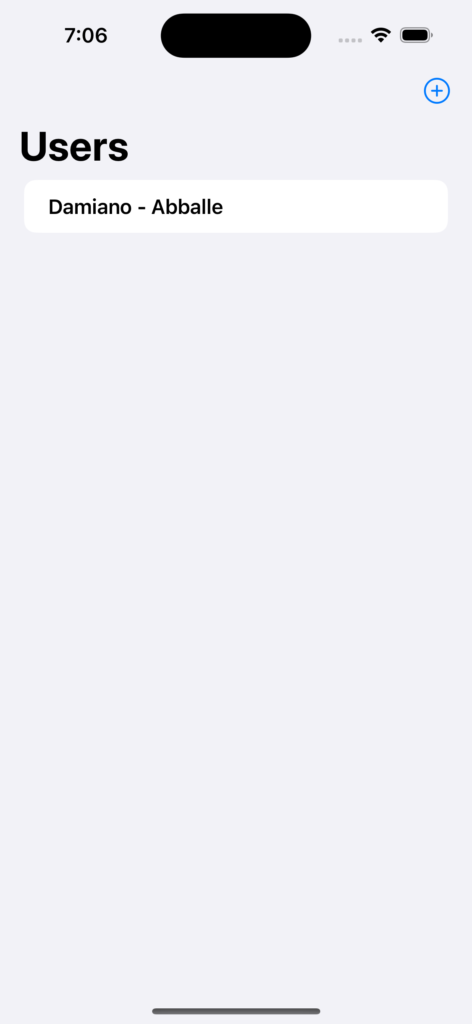
If we run the application, this will be the result:

UPDATE USER
Finally for Update, we have to modify the view called ContentView and the view called NewUser.
From ContentView, we have to pass the object User to update in the view NewUser where, it will show the previous values and here, it will be possible to modify them:
[CONTENTVIEW.SWIFT]
import SwiftUI
import CoreData

struct ContentView: View {
    // with Environment we can access here to the viewContext
    @Environment(\.managedObjectContext) private var viewContext

    // FetchRequest is used to extract data from the persistent storage
    // In this case the entity User without any sort and any predicate
    // In sql this would be: select * from user
    @FetchRequest(entity: User.entity(), sortDescriptors: [], predicate: nil)
    // We put the result of the query above in a variable called lstUser
    private var lstUser: FetchedResults<User>

    func UpdateUser(inputUser: User) -> Void{
        // for the update we pass the object User selected
        objUser = inputUser
        showNewUser = true
        isUpdate = true
    }

    init() {
        _showNewUser = State(initialValue: false)
        _isUpdate = State(initialValue: false)
    }

    // variable used to show the Form for creating a new User
    @State var showNewUser: Bool
    @State private var objUser: User = User()
    @State private var isUpdate: Bool

    var body: some View {
        NavigationView{
            List{
                // we show all users
                ForEach(lstUser) { user in
                    HStack{
                        VStack(alignment: .leading){
                            Text("\(user.name!) - \(user.surname!)")
                                .font(.headline)
                        }
                        Spacer()
                        Button(action: { self.UpdateUser(inputUser: user)}) {
                            Text("Update")
                                .foregroundColor(.blue)
                        }
                    }
                }
                // delete item
                .onDelete {
                    indexSet in
                    for index in indexSet{
                        // we delete the user
                        viewContext.delete(lstUser[index])
                    }
                    do {
                        // save the operation
                        try viewContext.save()
                    } catch {
                        print(error.localizedDescription)
                    }
                }
            }
            .navigationTitle("Users")
            .navigationBarItems(trailing: Button(action: {
                    isUpdate = false
                    objUser = User()
                    showNewUser = true
                }, label: {
                    Image(systemName: "plus.circle")
                        .imageScale(.large)
                }))

            .sheet(isPresented: $showNewUser) {
                    NewUser(inputUser:  objUser , isUpdate: isUpdate)
                }
        }
    }
}
[NEWUSER.SWIFT]
import SwiftUI

struct NewUser: View {

    @Environment (\.presentationMode) var presentationMode
    // with Environment we can access here to the viewContext
    @Environment(\.managedObjectContext) private var viewContext

    @State var name: String = ""
    @State var surname: String = ""
    @State var isUpdate: Bool
    private var objUser: User
    private var title: String

    init(inputUser: User, isUpdate: Bool) {
        _isUpdate = State(initialValue: isUpdate)
        objUser = inputUser

        // definition of the title based on the variable isUpdate
        if(isUpdate)
        {
            title = "Modify User"
            // we put in name and surname the previous values
            _name = State(initialValue: inputUser.name!)
            _surname = State(initialValue: inputUser.surname!)
        }
        else
        {
            title = "New User"
        }
    }


    func SaveData() {
        var newUser:User

        if(isUpdate)
        {
            // For the update we use the User passed in input
            newUser = objUser
        }
        else
        {
            // We create a new User object
            newUser = User(context: viewContext)
            newUser.id = UUID()
        }

        newUser.name = name
        newUser.surname = surname


        do {
            // we try to save the new User
            try viewContext.save()
            // if it saved, system will print a message in the output view
            print("New User saved.")
        }
        catch {
            print(error.localizedDescription)
        }

        presentationMode.wrappedValue.dismiss()
    }

    var body: some View {
        NavigationView {
            Form {
                // Definition of User Info section
                Section{
                    TextField("Name", text: $name)
                    TextField("Surname", text: $surname)
                }
                Button(action: SaveData) {
                    Text(!isUpdate ? "ADD USER" : "MODIFY USER")
                }
                .navigationBarTitle(Text(self.title))
            }
        }
    }
}

struct NewUser_Previews: PreviewProvider {
    static var previews: some View {
        NewUser(inputUser: User(), isUpdate: false)
    }
}
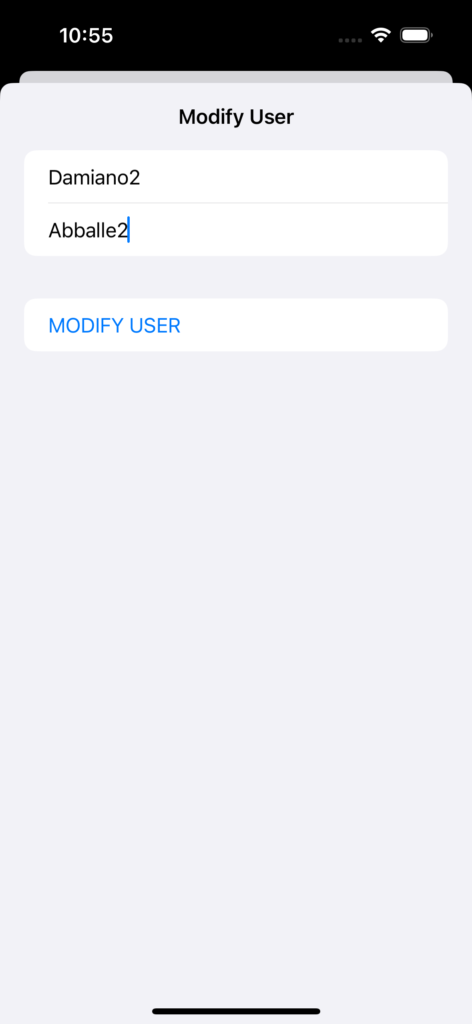
If we run the application, this will be the result: