Blazor is a UI Framework created by Microsoft that utilizes C#, Razor and HTML, instead of HTML and Javascript.
It was designed to create easly Single Page Applications and it can run in two ways: Blazor Server or Blazor WebAssembly.
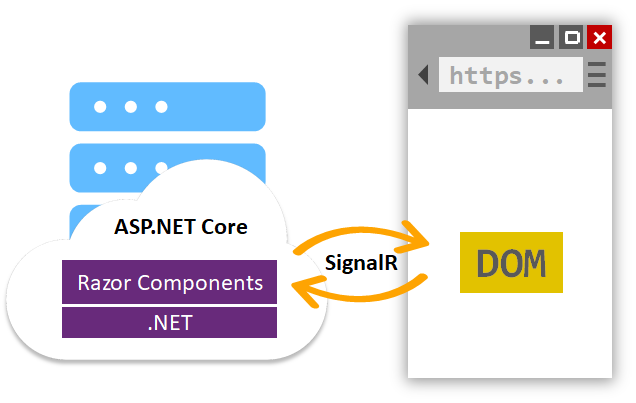
With Blazor Server it runs the client logic on the server and, with SignalR, it manages the events from UI and Server.
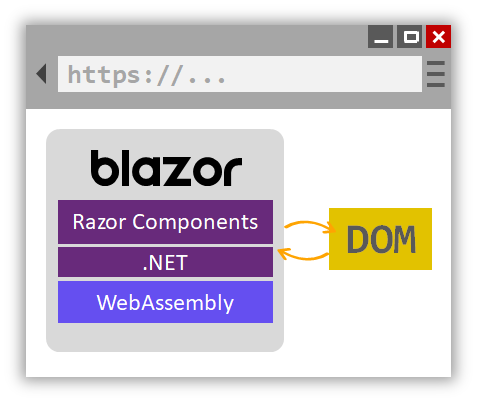
Instead with WebAssembly it runs code C#, using the open web standard called WebAssembly, directly in the browser without plugins or code transpilation.
If you need to use Javascript code, it is possible with some easy API, called JavaScript interoperability.
For all information about Blazor, please go to the Official Web Site.
In this post, we will see how to install Blazor and how WebAssembly Blazor application works.
First of all, we need to install ASP.NET Core 3.0 and then, with the command
dotnet new -i Microsoft.AspNetCore.Blazor.Templates::3.0.0-preview9.19465.2
the Blazor WebAssembly template
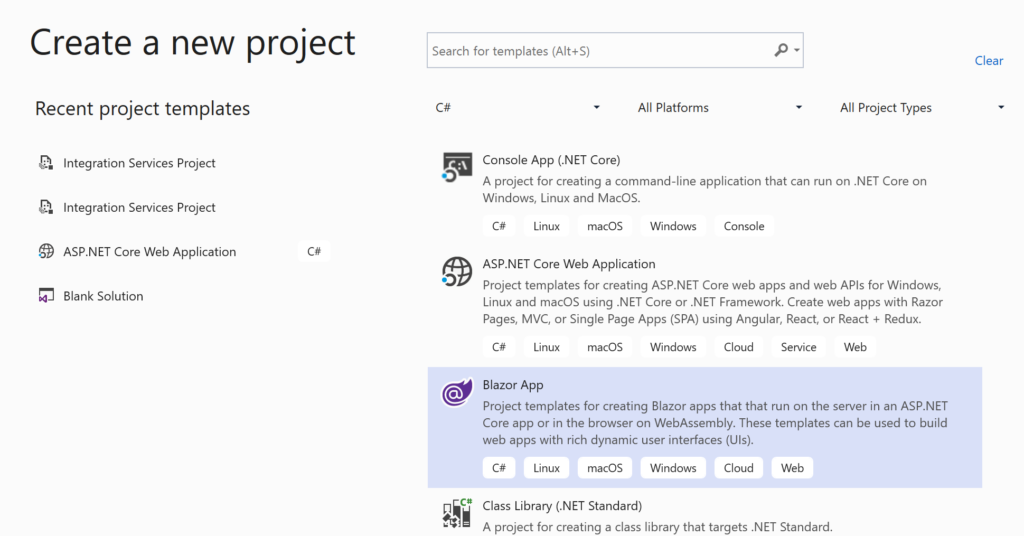
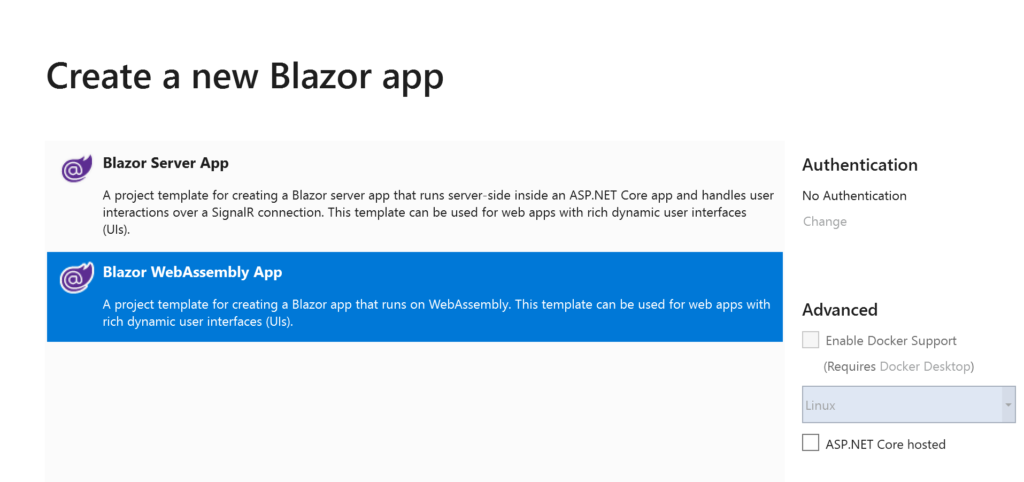
Now, we can open Visual Studio, select the Blazor App project template:
and then we create a Blazor Webassembly App:
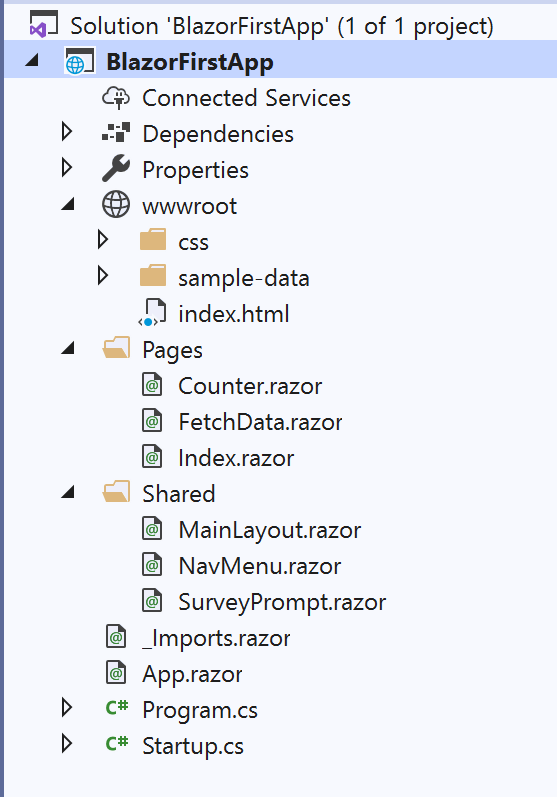
This is the project created by default:
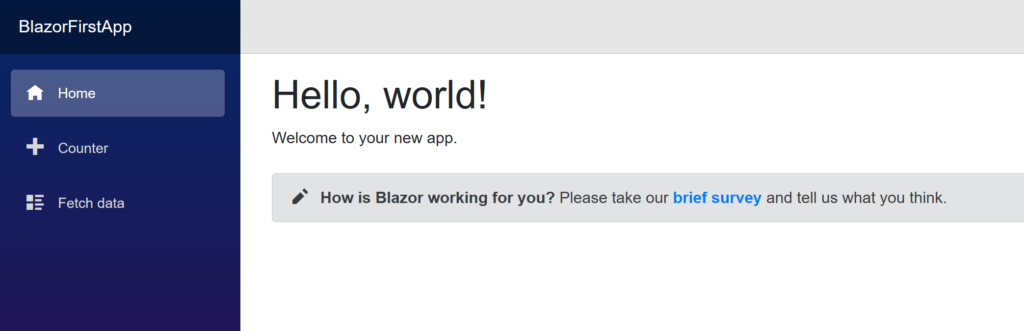
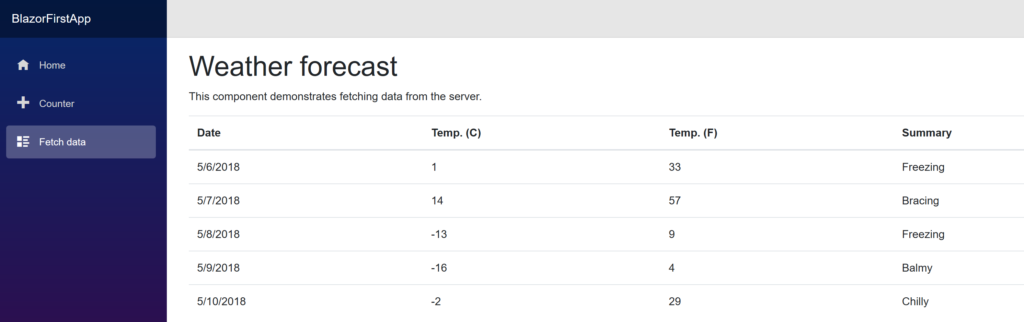
If we run the application (F5), this will be the result:
But, how does it work?
The first class that runs, is
[PROGRAM.CS]
public class Program
{
   public static void Main(string[] args)
   {
      CreateHostBuilder(args).Build().Run();
   }

   public static IWebAssemblyHostBuilder CreateHostBuilder(string[] args) =>
            BlazorWebAssemblyHost.CreateDefaultBuilder().UseBlazorStartup<Startup>();
}
and it calls (row 9) the class
[STARTUP.CS]
public class Startup
{
    public void ConfigureServices(IServiceCollection services)
    {
    }

    public void Configure(IComponentsApplicationBuilder app)
    {
        app.AddComponent<App>("app");
    }
}
The row number 9 is very interesting, because it adds the component called App into the tag “app”.
The tag “app” is in the file
[INDEX.HTML]
<!DOCTYPE html>
<html>
<head>
    <meta charset="utf-8" />
    <meta name="viewport" content="width=device-width" />
    <title>BlazorFirstApp</title>
    <base href="/" />
    <link href="css/bootstrap/bootstrap.min.css" rel="stylesheet" />
    <link href="css/site.css" rel="stylesheet" />
</head>
<body>
    <app>Loading...</app>

    <script src="_framework/blazor.webassembly.js"></script>
</body>
</html>
instead the component App is the file
[APP.RAZOR]
<Router AppAssembly="@typeof(Program).Assembly">
    <Found Context="routeData">
        <RouteView RouteData="@routeData" DefaultLayout="@typeof(MainLayout)" />
    </Found>
    <NotFound>
        <LayoutView Layout="@typeof(MainLayout)">
            <p>Sorry, there's nothing at this address.</p>
        </LayoutView>
    </NotFound>
</Router>
This file defines the Route and defines MainLayout.razor as the application’s layout:
@inherits LayoutComponentBase

<div class="sidebar">
    <NavMenu />
</div>

<div class="main">
    <div class="top-row px-4">
        <a href="http://blazor.net" target="_blank" class="ml-md-auto">About</a>
    </div>

    <div class="content px-4">
        @Body
    </div>
</div>
In the row number 4, the application loads the component NavMenu.razor into <div class=”sidebar”>, instead into @Body will be display all application’s components.
[NAVMENU.RAZOR]
<div class="top-row pl-4 navbar navbar-dark">
    <a class="navbar-brand" href="">BlazorFirstApp</a>
    <button class="navbar-toggler" @onclick="ToggleNavMenu">
        <span class="navbar-toggler-icon"></span>
    </button>
</div>

<div class="@NavMenuCssClass" @onclick="ToggleNavMenu">
    <ul class="nav flex-column">
        <li class="nav-item px-3">
            <NavLink class="nav-link" href="" Match="NavLinkMatch.All">
                <span class="oi oi-home" aria-hidden="true"></span> Home
            </NavLink>
        </li>
        <li class="nav-item px-3">
            <NavLink class="nav-link" href="counter">
                <span class="oi oi-plus" aria-hidden="true"></span> Counter
            </NavLink>
        </li>
        <li class="nav-item px-3">
            <NavLink class="nav-link" href="fetchdata">
                <span class="oi oi-list-rich" aria-hidden="true"></span> Fetch data
            </NavLink>
        </li>
    </ul>
</div>

@code {
    bool collapseNavMenu = true;

    string NavMenuCssClass => collapseNavMenu ? "collapse" : null;

    void ToggleNavMenu()
    {
        collapseNavMenu = !collapseNavMenu;
    }
}
In this component, is interesting to see how is very easy to call a C# method in the page (method ToggleNavMenu) and, how is very easy to manage the route.
Every href property is a link with the component that has the same href value define in the directive @page.
For example, we look at the Counter.razor component:
@page "/counter"

<h1>Counter</h1>

<p>Current count: @currentCount</p>

<button class="btn btn-primary" @onclick="IncrementCount">Click me</button>

@code {
    int currentCount = 0;

    void IncrementCount()
    {
        currentCount++;
    }
}
The value of @page is the same define in the row 16 of NavMenu.razor and this creates the link between the menu and the component.
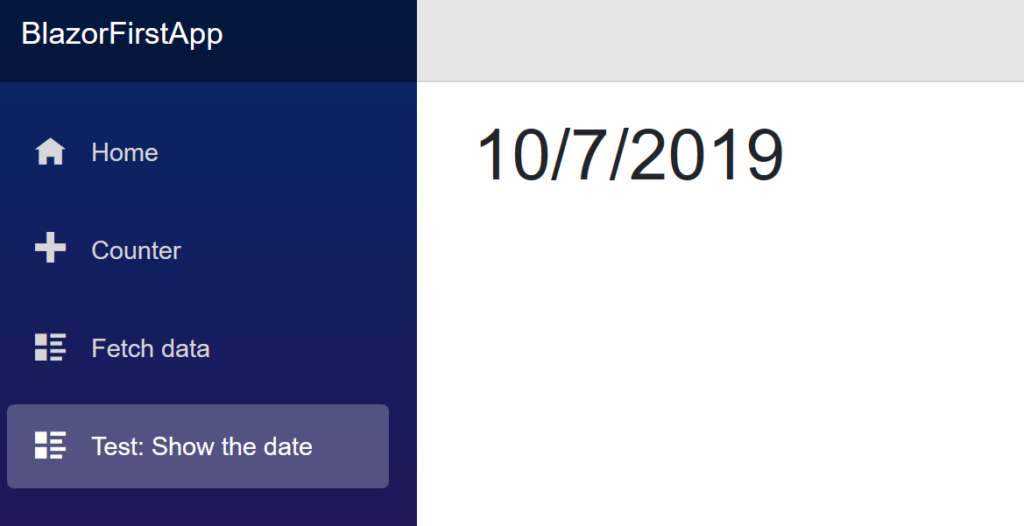
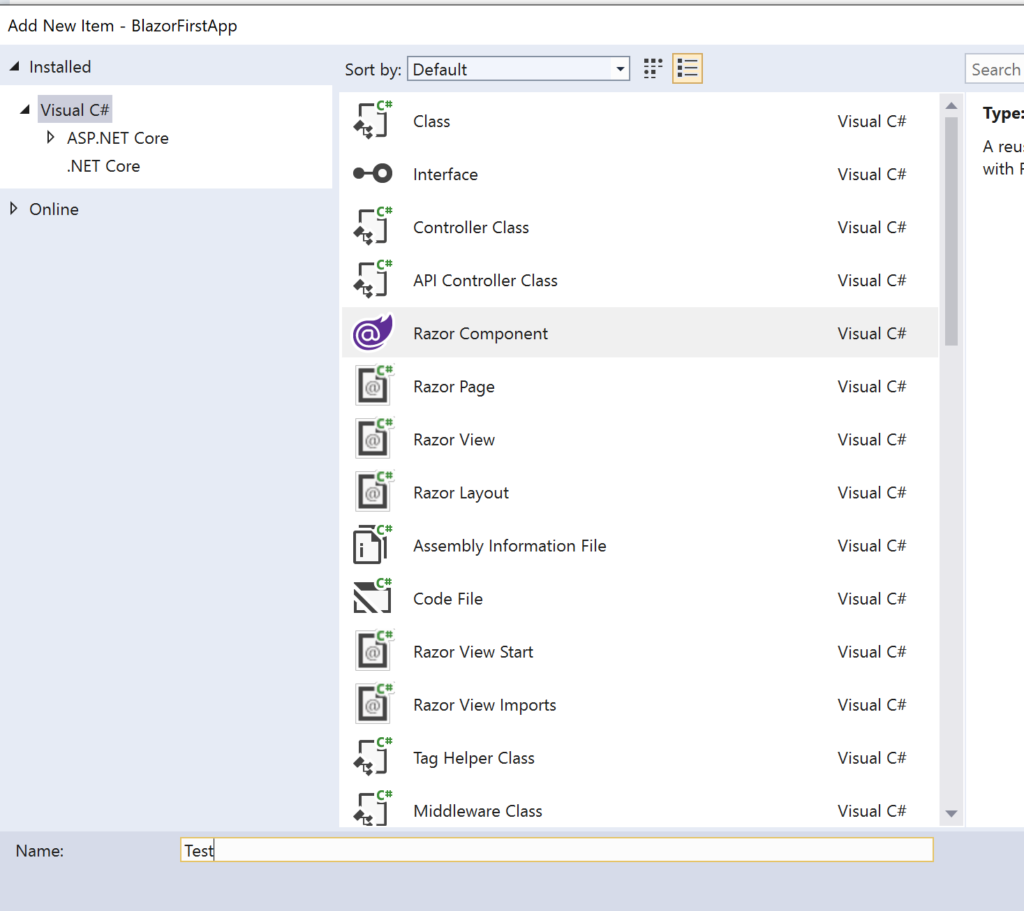
Now, we will to create a new Blazor component called Test and we will add it in the menu:
In the component Test.razor, we write this code:
@page  "/test"

<h1>@DateTime.Now.ToShortDateString()</h1>
and then, we create the link between it and the menu:
[NAVMENU.RAZOR]
<li class="nav-item px-3">
      <NavLink class="nav-link" href="test">
           <span class="oi oi-list-rich" aria-hidden="true"></span> Test: Show the date
      </NavLink>
</li>
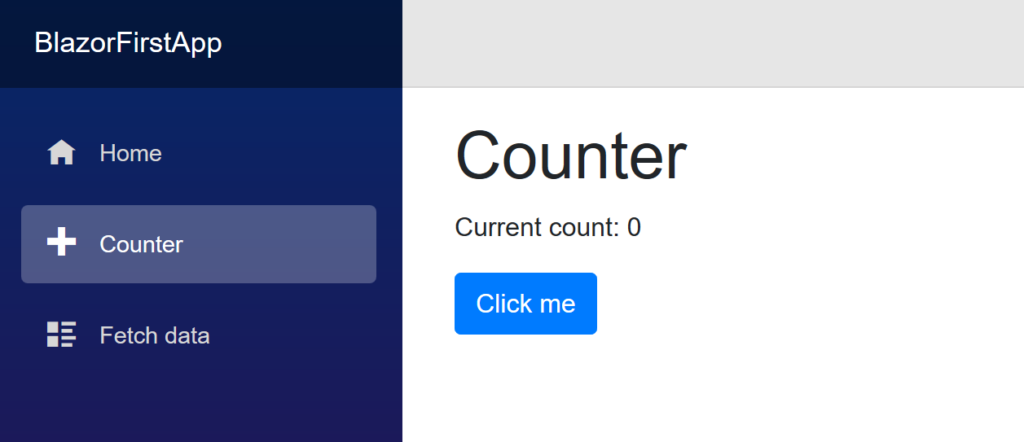
Now, if we run the application, this will be the result: