In this post, we will see how to push a Docker image into Docker Hub, using VS 2019.
We open VS 2019, select a new ASP.NET Core Web Application project, select API, check “Enable Docker Support” and finally we push the “Create” button.
Compared to a standard API project, this project has only a Dockerfile file more.
It is nothing but a text document that contains all the commands a user could call on the command line to assemble an image.
[DOCKERFILE]
#See https://aka.ms/containerfastmode to understand how Visual Studio uses this Dockerfile to build your images for faster debugging.

FROM mcr.microsoft.com/dotnet/core/aspnet:3.1-buster-slim AS base
WORKDIR /app
EXPOSE 80
EXPOSE 443

FROM mcr.microsoft.com/dotnet/core/sdk:3.1-buster AS build
WORKDIR /src
COPY ["TestDocker.csproj", ""]
RUN dotnet restore "./TestDocker.csproj"
COPY . .
WORKDIR "/src/."
RUN dotnet build "TestDocker.csproj" -c Release -o /app/build

FROM build AS publish
RUN dotnet publish "TestDocker.csproj" -c Release -o /app/publish

FROM base AS final
WORKDIR /app
COPY --from=publish /app/publish .
ENTRYPOINT ["dotnet", "TestDocker.dll"]
We start adding a folder called “Model”, where we will define our Business Layer:
[USER.CS]
namespace TestDocker.Model
{
    public class User
    {
        public int Id { get; set; }
        public string UserName { get; set; }
        public string TypeUser { get; set; }
        public string CreationDate { get; set; }
    }
}
[ICORE.CS]
using System.Collections.Generic;

namespace TestDocker.Model
{
    public interface ICore
    {
        List<User> GetAllUsers();
    }
}
[CORE.CS]
using System;
using System.Collections.Generic;

namespace TestDocker.Model
{
    public class Core : ICore
    {
        private List<User> _lstUser;
        public Core()
        {
            _lstUser = new List<User>()
            {
                new User{ Id=1, UserName="Damiano", TypeUser="Admin", CreationDate=DateTime.Now.AddDays(-300).ToShortDateString()},
                new User{ Id=2, UserName="Dorian", TypeUser="Admin", CreationDate=DateTime.Now.AddDays(-280).ToShortDateString()},
                new User{ Id=3, UserName="Jon", TypeUser="Reader", CreationDate=DateTime.Now.AddDays(-250).ToShortDateString()},
                new User{ Id=4, UserName="Clare", TypeUser="Editor", CreationDate=DateTime.Now.AddDays(-220).ToShortDateString()},
                new User{ Id=5, UserName="Clare", TypeUser="Test", CreationDate=DateTime.Now.AddDays(-100).ToShortDateString()},
                new User{ Id=6, UserName="Clare", TypeUser="Test", CreationDate=DateTime.Now.AddDays(-100).ToShortDateString()},
                new User{ Id=7, UserName="Clare", TypeUser="Test", CreationDate=DateTime.Now.AddDays(-100).ToShortDateString()},
            };
        }
        public List<User> GetAllUsers()
        {
            return _lstUser;
        }
    }
}
Finally, we add a controller called “UsersController”:
[USERSCONTROLLER.CS]
using Microsoft.AspNetCore.Mvc;
using System.Collections.Generic;
using System.Threading.Tasks;
using TestDocker.Model;

namespace TestDocker.Controllers
{
    [ApiController]
    [Route("[controller]")]
    public class UsersController : Controller
    {
        ICore objCore;

        public UsersController(ICore inputCore)
        {
            objCore = inputCore;
        }

        [HttpGet]
        public async Task<ActionResult<IEnumerable<User>>> GetAllUsers()
        {
            var lstUsers = await Task.Run(() => objCore.GetAllUsers());

            if (lstUsers == null)
            {
                return NotFound();
            }

            return Ok(lstUsers);
        }
    }
}
Obviously this Web API service is very simple but, this isn’t the goal of the post.
Before running the application we have to modify other two files:
[STARTUP.CS]
public void ConfigureServices(IServiceCollection services)
{
    // definition of dependency between ICore and Core
    services.AddScoped<ICore, Core>();
    services.AddControllers();
}
[LAUNCHSETTINGS.JSON]
{
  "iisSettings": {
    "windowsAuthentication": false,
    "anonymousAuthentication": true,
    "iisExpress": {
      "applicationUrl": "http://localhost:60284",
      "sslPort": 44371
    }
  },
  "$schema": "http://json.schemastore.org/launchsettings.json",
  "profiles": {
    "IIS Express": {
      "commandName": "IISExpress",
      "launchBrowser": true,
      "launchUrl": "users",
      "environmentVariables": {
        "ASPNETCORE_ENVIRONMENT": "Development"
      }
    },
    "TestDocker": {
      "commandName": "Project",
      "launchBrowser": true,
      "launchUrl": "users",
      "environmentVariables": {s
        "ASPNETCORE_ENVIRONMENT": "Development"
      },
      "applicationUrl": "https://localhost:5001;http://localhost:5000"
    },
    "Docker": {
      "commandName": "Docker",
      "launchBrowser": true,
      "launchUrl": "{Scheme}://{ServiceHost}:{ServicePort}/users",
      "publishAllPorts": true,
      "useSSL": true
    }
  }
}
Now, we select Docker and then we run the application:

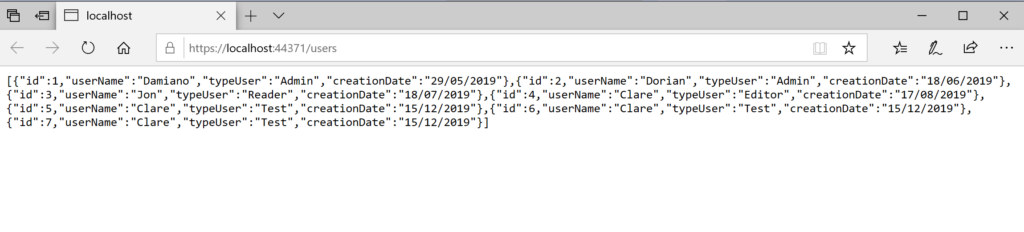
The Web API service works fine and now, we can push our image into Docker Hub.
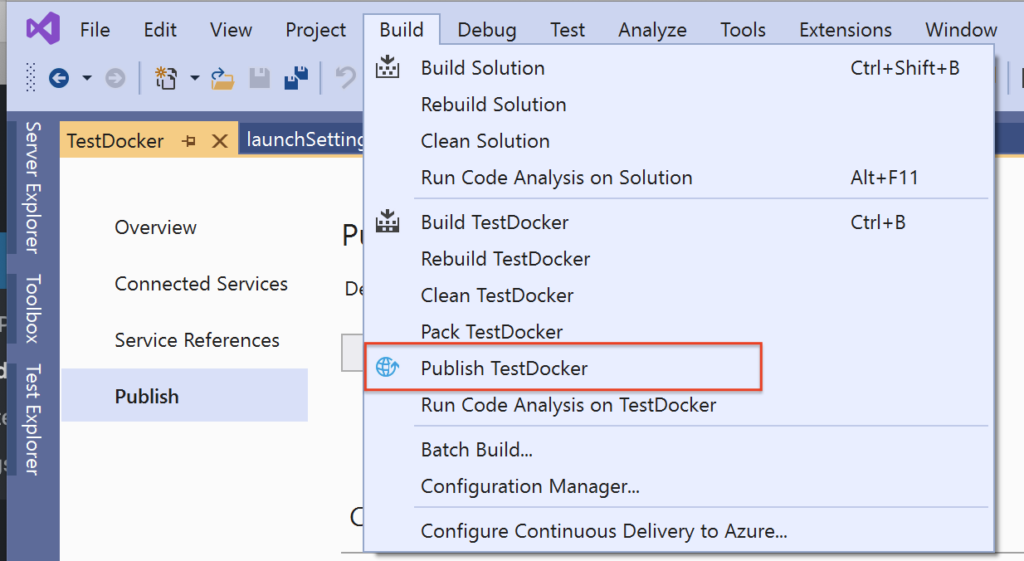
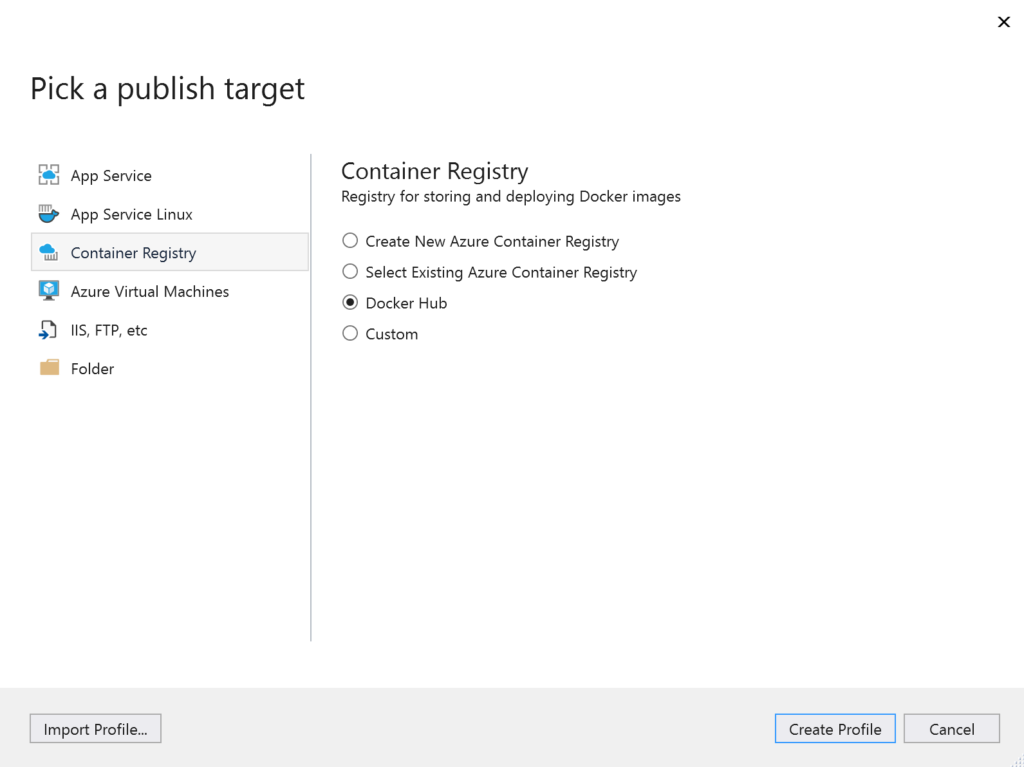
We click on Build and then we select the option “Publish TestDocker”
We choose “Docker Hub”:
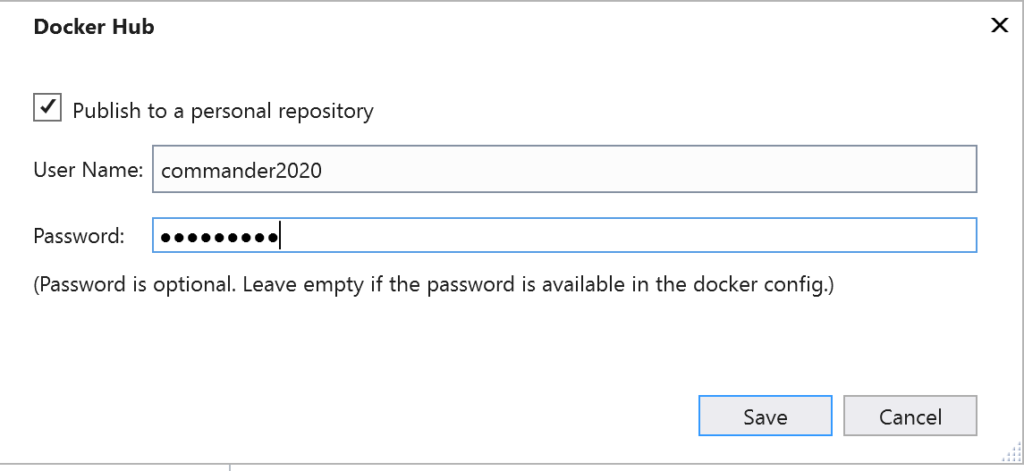
and then, we insert our credentials:
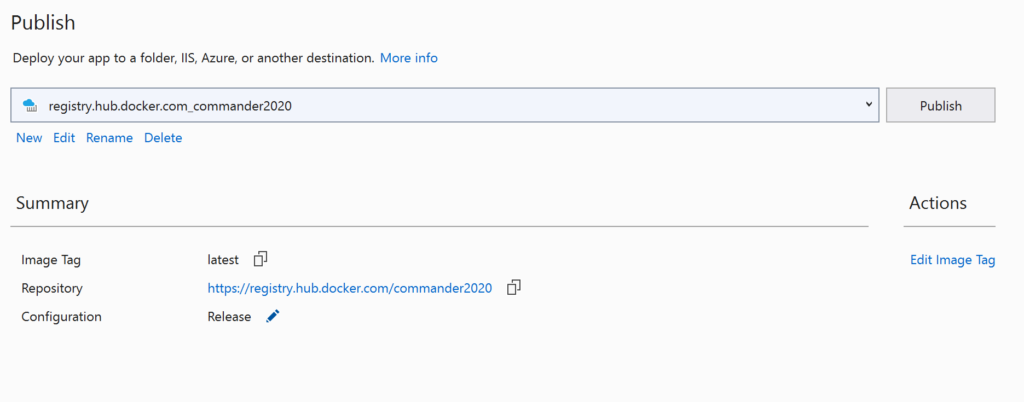
Finally, we push the “Publish” button, in order to start the deploy on Docker Hub:

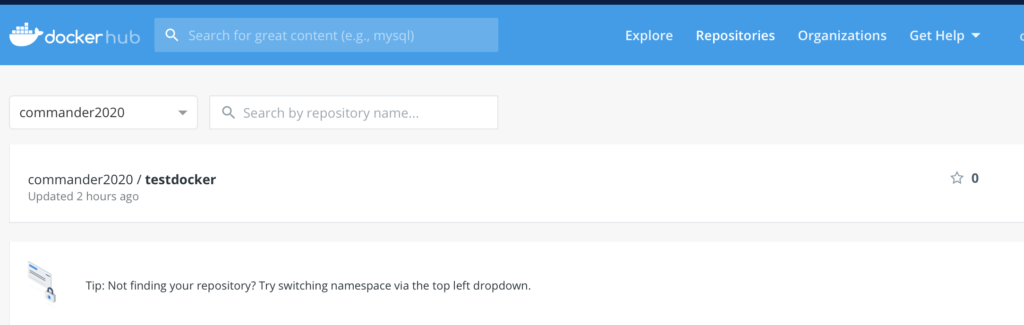
In order to verify everything went well, we open a browser, go to https://hub.docker.com, sign in, go to Repositories and finally we should see our image: