In this post, we will see how to create, read and write an Excel file using the module openpyxl.
First of all, we need to install the module, using the command:
pip install openpyxl

Then, we create an Excel file called TestExcel.xlsx, so defined:
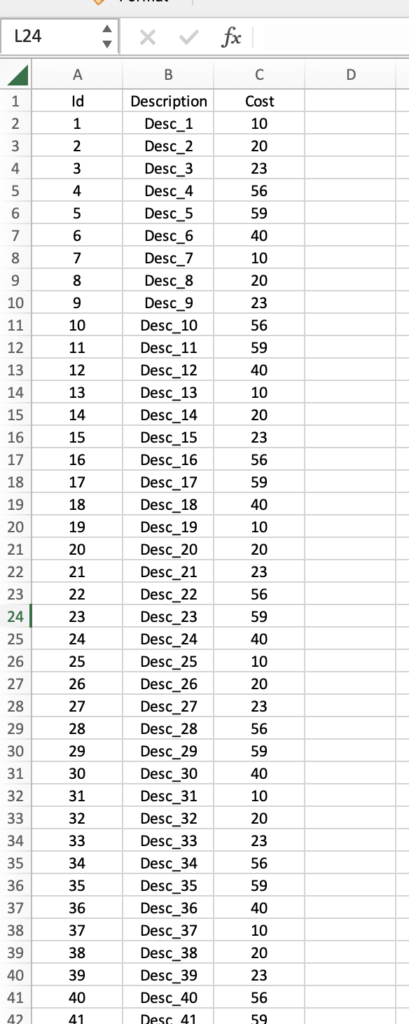
HOW TO READ AND WRITE AN EXCEL FILE
We create a file called main.py where we will read all rows in TestExcel.xls then, we will select all rows with Cost>=40 and finally, we will write in the column D the value “Ok”.
At the end, we will save the modified file.
[MAIN.PY]
import openpyxl
# we load the file
objFile = openpyxl.load_workbook("TestExcel.xlsx")
# we select the sheet called 'List'
selectedSheet = objFile['List']
# we get the number of the rows
rowsCount = selectedSheet.max_row
# we read all rows starting from 2 because, in the first row, there are the columns' names
for item in range(2,rowsCount+1):
# we take only items with cost >= 40
if(int(selectedSheet.cell(item, 3).value) >= 40):
# we show in output the row
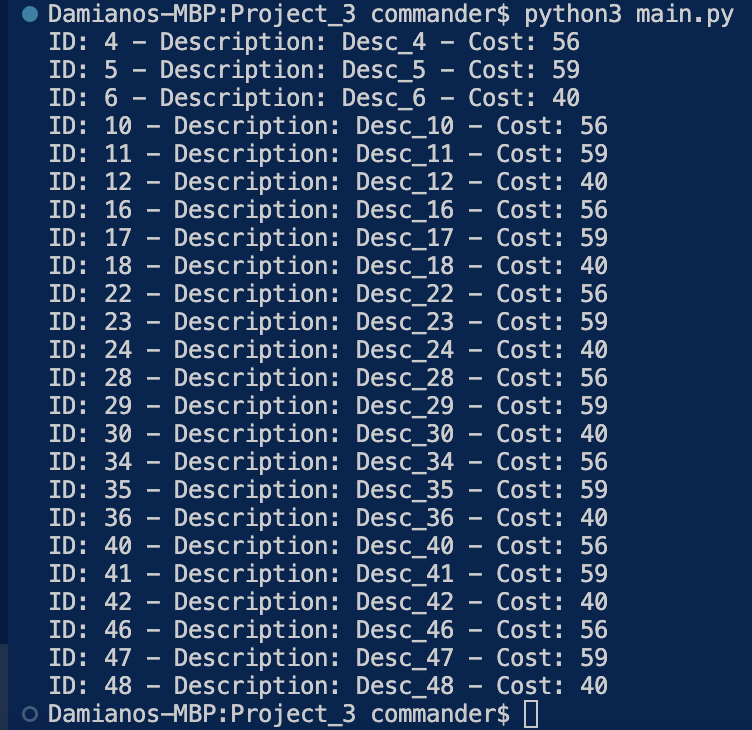
print(f"ID: {selectedSheet.cell(item, 1).value} - Description: {selectedSheet.cell(item, 2).value} - Cost: {selectedSheet.cell(item, 3).value}")
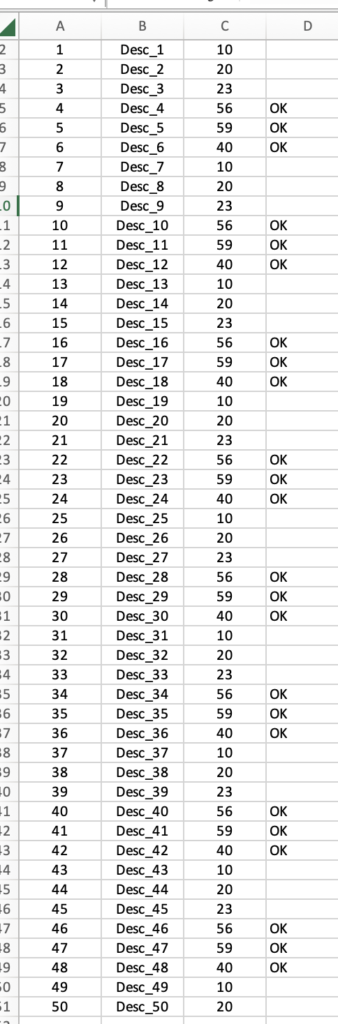
# we write Ok in the column 'D', after the price
selectedSheet.cell(item, 4).value = "OK"
# we save the file
objFile.save("TestExcel.xlsx")
If we run the code, this will be the result:
and, this is the modified Excel file:
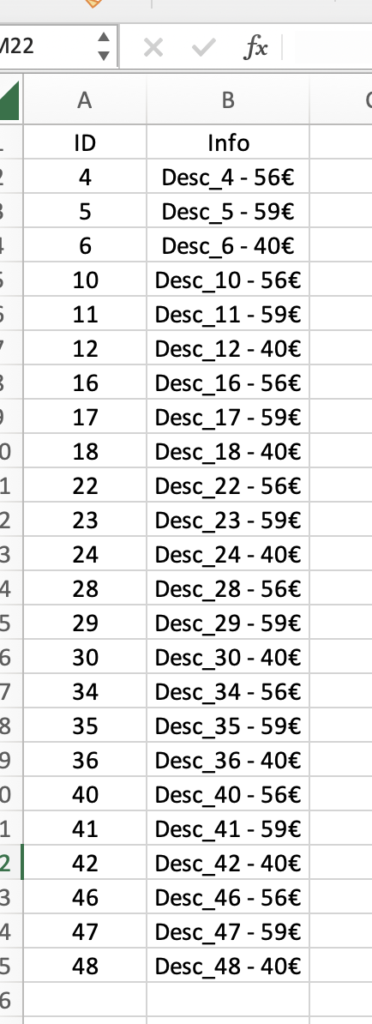
HOW TO CREATE A NEW EXCEL FILE
Now, we will modify the main.py file in order to create a new Excel file called “NewFileExcel.xlsx” where, we will write all items selected above:
[MAIN.PY]
import openpyxl

# we load the file
objFile = openpyxl.load_workbook("TestExcel.xlsx")

# we select the sheet called 'List'
selectedSheet = objFile['List']

# we get the number of the rows
rowsCount = selectedSheet.max_row

# we define a dictionary where key-> ID and  value -> 'Description' + 'Cost'
finalList = {}

# we read all rows starting from 2 because, in the first row, there are the columns' names
for item in range(2,rowsCount+1):
    # we take only item with cost >= 40
    if(int(selectedSheet.cell(item, 3).value) >= 40):
        # we show in output the row
        print(f"ID: {selectedSheet.cell(item, 1).value} - Description: {selectedSheet.cell(item, 2).value} - Cost: {selectedSheet.cell(item, 3).value}")
        # we save in finalList the items selected
        finalList[int(selectedSheet.cell(item, 1).value)] = f"{selectedSheet.cell(item, 2).value} - {selectedSheet.cell(item, 3).value}€"
        # we write OK in the column after the price
        selectedSheet.cell(item, 4).value = "OK"


# we save the file
objFile.save("TestExcel.xlsx")


# we create a new Excel file
wb = openpyxl.Workbook()

# we grab the active worksheet
ws = wb.active

# we define the title for two columns:
ws['A1'] = "ID"
ws['B1'] = "Info"

# we start to write from the row number 2
index = 2

try:
    # we read all the item selected
    for i in finalList:
        # we define the columns to use
        column1 = f"A{index}"
        column2 = f"B{index}"
        # we write the values in the cells
        ws[column1] = i
        ws[column2] = finalList[i]
        # we add a new row
        index = index + 1


    # we save the file
    wb.save("NewFileExcel.xlsx")

    # we show a message when the file has been created
    print("A new file called NewFileExcel.xlsx has been created.")

except Exception as error:
    print(f"Attention! Errors during the creation of the new Excel file, {error}")
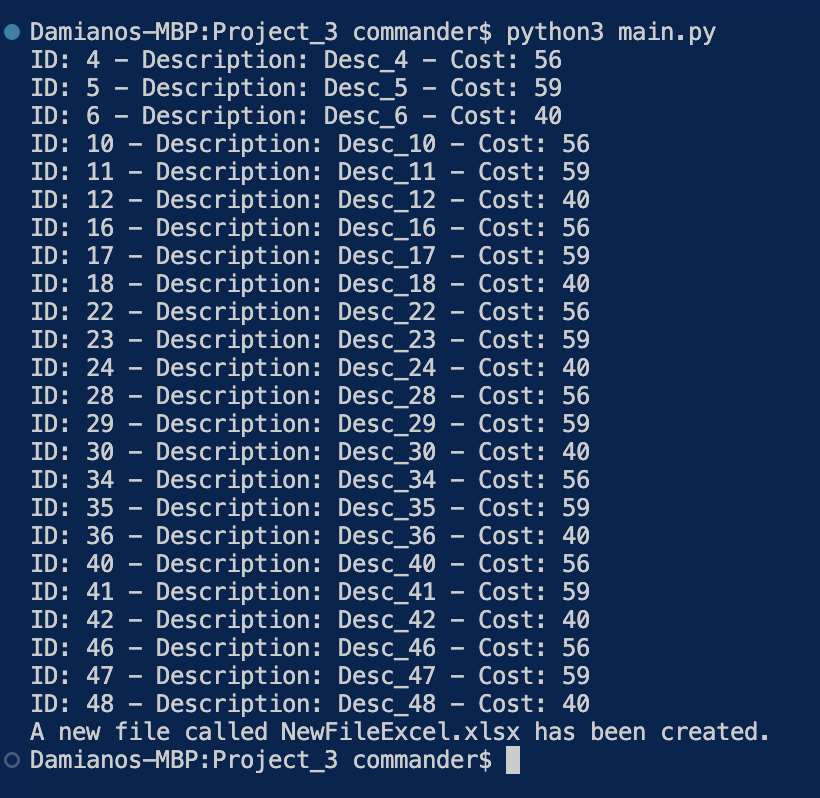
We have done and now, if we run the code, this will be the result:
and, this is the new Excel file: